OTN (Oracle Technology Network)
Readers have noticed, that Oracle has
published an article from Richard Monson-Haefel about Ruby On Rails on Oracle. This
article introduces the Ruby On Rails framework and explains how to use
it to access an Oracle database. (Oracle 10g Express Edition to be exact)
If you are not familiar at all with Ruby On Rails, it is important to
notice that it has nothing to do with Java, J2EE. It is a Ruby
based framework. So yes Ruby On Rails is really interesting,
powerful and so on... but for me as a Java developer I would like to do
the same using Java (or equivalent) leveraging the investment that I
have done in J2EE; also important I want to be able to deploy and
manage applications that are developed this way using my tools such as
Oracle Enterprise Manager Application Server Control.
The paradigm "coding by convention" that is the driver of Ruby on Rails
has been leveraged to developed a new framework: GRAILS. Grails uses
Groovy as the underlying language, so it runs on a JVM and can leverage
any existing Java API.
If you are a Java developer you will find very interesting to use this
framework to accelerate the development of Web applications. If you are
not yet a Java developer but need to develop Web application faster,
and deploy the to your J2EE application server, Grails is also a very
good tools.
Since I have started with Richard's article I will use the same
application/database schema to develop my first GRAILS application, and
also use the same structure in my article...(is it what we call lazy loading?)
What is Groovy? What is Grails?
Groovy is a dynamic language that leverage features from other
languages such as Ruby, Jython, and Smalltalk. Groovy is running at the
top of a Java VM and makes available any existing Java objects (so all
the API) to Groovy. Groovy is currently under standardization with the
JSR-241.
You can learn more about Groovy on the
Groovy
site and is
project
leader's (Guillaume Laforge) blog.
GRAILS is to Groovy what Ruby On Rails is to Ruby. Originally named "
Groovy On Rails",
this name has been dropped in favor of Grails to avoid
confusion/competition. Like Ruby on Rails, Grails is designed to
create
CRUD
(
Create Read Update
Delete) Web applications. You can learn more
about Grail on the
Grails site and is
project
leader's (Graeme Rocher) blog.
Let's now dive in the sample application, for this, as stated earlier I
am using the sample application described in the OTN articles.
Example: The product Catalog
Step 1: Set up the Oracle database
If you have not set up the schema and table from the article you just
need to create the following objects:
CREATE TABLE comics (
 id NUMBER(10) NOT NULL,
 title VARCHAR2(60),
 issue NUMBER(4),
 publisher VARCHAR2(60),
 PRIMARY KEY (id)
);
CREATE SEQUENCE comics_seq;
Based on the OTN article I have created this table in the
ruby schema.
Step 2: Install
Grails
Grails installation is straight forward and explained in the
Installation
guide, basically:
- Download the binaries (I used Grails 0.2)
- Setup the different environment variable (GRAILS_HOME, JAVA_HOME, PATH), I
used Java 5.
You are done !
Step 3: create the Web Application
Now we have installed the product, the next step is to create the
application itself.
Create the
application
The
create-app command is
creating the full project, with the template
with placeholder for the different components of your application such
as configuration, MVC, and library and much more. To do it enter the
following command, in your command line interface:
> grails
create-app
....
.....
create-app:
[input] Enter application name:
comics_catalog
.....
As you will see, Grails uses Ant intensively, the
create-app
command will ask you for an application name, enter for example
comics_catalog.
The created application contains now a list of directory allowing
developer to start to build the application using Groovy, Grails and
any Web components.
Add the
Business Logic and Model: Domain
Classes
One of the biggest differences between Grails and RoR, is the fact that
the main components of your application development is not the Table
like you have in RubyOnRails but the "Domain Class". The
domain class are the core of the business application, they contains
the state and the behavior of your application.
So the next step is to create a Domain Class for the Comics, to do that
you just need to go in the home directory of your project, eg cd
comics_catalog and run the
create-domain-class.
> cd
comics_catalog
> grails create-domain-class
....
create-domain-class:
[input] Enter domain class name:
comics
....
When the command ask you to enter the class name, enter
comics. Grails, will not use the
same naming convention that RoR has, so you need to use the same name
for the class and the table you want to map your object on. The
persistence layer is made using GROM (Grails Object Relational Mapping)
that leverage hibernate.
Note: In our case what we are doing is to leverage an existing database
object and create the domain class at the top of it. Usually, Grails
uses a different approach where everything is driven by the
application, so you create the domain class first and then Grails will
create the different database objects.
The Comics class does not have any information related to the mapping
itself, so you have to create the different attributes in the domain
class. This is where you you start to use Groovy, the domain class is
located in the following location:
- ./comics_catalog/grails-app/domain/Comics.groovy
Note hat by default Grails create the class with 2 attributes: id and
version, keep them in place, and add title, issue and
publisher.
class Comics {
@Property Long id
@Property Long version
// new properties for the Comics class
@Property String title
@Property Long issue
@Property String publisher
String toString() { "${this.class.name} : $id" }
}
We are all set, we are ready to run the magic command that will create
the different screens and flow.
Create the
different screens from the domain class
You can now run the
generate-all
command to create all the different screens.
> grails
generate-all
....
input-domain-class:
[input] Enter domain class name:
comics
....
This command creates the different Views and Controllers, you can take
a look to the directories:
- ./comics_catalog/grails-app/controllers
- ./comics_catalog/grails-app/views
Configure
the database access
What we have to do is now to configure the application to use the
Oracle database and schema.
Grails uses a configuration file for data source:
- ./comics_catalog/grails-app/conf/ApplicationDataSource.groovy
Let's edit this file to connect to our Oracle database.
class
ApplicationDataSource {
@Property boolean pooled = true
@Property String dbCreate = "update" // one of
'create', 'create-drop','update'
@Property String url =
"jdbc:oracle:thin:@localhost:1521:XE"
@Property String driverClassName =
"oracle.jdbc.OracleDriver"
@Property String username = "ruby"
@Property String password = "ruby"
}
Nothing special concerning the properties such as URL, DriverClassName,
username and password.
The one that is interesting is the
dbCreate,
that allows you to configure the behavior on the schema to create or
not objects.In our sample the table exists, so we want to reuse the
object, but we want to be sure that we have all the mandatory objects,
columns too, so I selected
update.
The next thing to do is to add the Oracle JDBC driver to the
application, to make it available. To make it available you just need
to copy the JDBC driver into the lib directory of your application. In
my case I am using Oracle XE so I copy the file from the following
location:
- ORACLE_XE_HOME/app/oracle/product/10.2.0/server/jdbc/lib/ojdbc14.jar
to
- ./comics_catalog/lib/
Step 4: Run the application
Grails provide a way to run the application in stand alone mode, the command is
run-app. This command starts an Web container (based on Jetty) with the application deployed.
> grails run-app
Note: Jetty will start on port 8080, in order to start in on a different port like e.g. 9090 use:
grails -Dserver.port=9090 run-app
You can now access the application using the following URL:
http://localhost:8080/comics_catalog/comics/
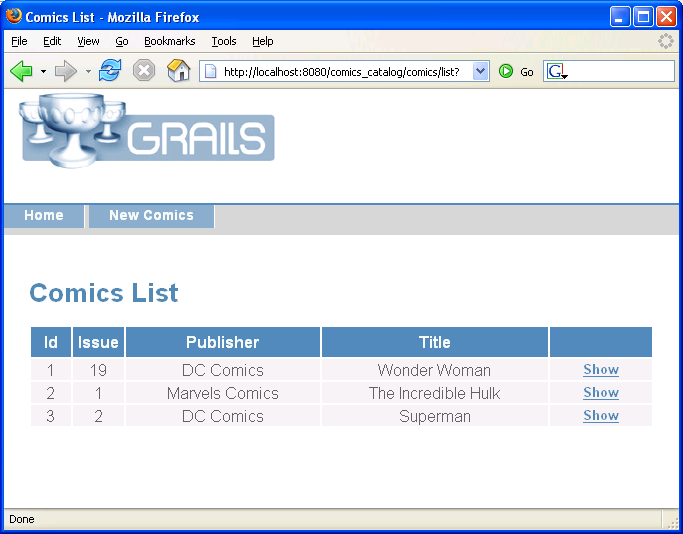
Your browser should show the list of comics from the Comics table.
List of Comics
You can create a new entry by clicking on the "New Comics" tab, and
view/edit/delete existing record by clicking on the "Show" link.
As you see the creation of an application is really easy. The next step is to deploy the application in your application server.
Step 5: Deploy the application
Grails provides a command to package the application as a WAR ready to
be deployed, so in the root directory of your project you can run the
following command:
> grails war
When you run this command you end with a WAR with the name of your
application located in the root of your project, in our case:
comics_catalog.war
If you take a look to this WAR you'll see that it is quite big ~10Mb,
this is because all the libraries are included in the Lib directory of
the web application. You can see the exact structure of the WAR in the
./tmp (
./comics_catalog/tmp/war) directory of the application.
You can deploy the application as it is to Oracle Application Server 10
g,
but to avoid the issue with the class loader you should configure the
Web application to load the local classes first. It can be done during
deployment with the class loader configuration screen:

You can also save this configuration in a deployment plan to facilitate later deployment.
When the deployment is done you can access the application using the OracleAS host and port, something like:
http://localhost:8888/comics_catalog/comics/list
You can now administer and monitor the application like any other J2EE application deployed in OracleAS 10g.
Better Deployment Options
- I personally do not like the idea of shipping all the Jar
files in the WAR file, so instead you can use the OracleAS Shared
Libraries to create a Grails library by uploading and configuring all
the Jars. And package the War without all these libraries.
- Also you should be able to configure Hibernate/Spring to
use a standard define Data source and use the JNDI name to lookup the
connections.
Conclusion
GRAILS like Ruby On Rails are really interesting frameworks allowing
developers to create quickly Web application that access relational
database and especially the Oracle Database.
Grails is quite new (release 0.2), but the documentation is really nice
and complete. I will encourage all developers that are interested by
such framework to use it and provide feedback to the development team.
I will try provide other post about deployment of Grails on OracleAS,
but also related to other interesting features of this framework, for
example Ajax support, Validations etc etc.
Resources
 Click to Enlarge